Meta Ads Manager 2026: A Step-by-Step Guide with Screenshots to Create Your First Campaign
A step-by-step guide to the Ads Manager, featuring real screenshots from our own ad account from October 2026 and the exact wording of all interface text. It also includes the mandatory EU disclosure—without which no ad will be published—the learning phase, and the changes from 2025 and 2026.
Date
Category
Author

“Where can I find the Ads Manager, and why does it look different to me than it does in the instructions?” This is a question many people ask when they want to run ads on Facebook and Instagram for the first time. The Ads Manager is Meta’s tool for creating ads for both platforms, and many people still search for it as the “Facebook Ads Manager,” even though it’s long since been renamed the “Meta Ads Manager.” Many guides we’ve reviewed show interfaces from years ago or campaign objectives that no longer exist.
That’s why, on October 2, 2026, we opened our own advertising account and documented every step right up until just before publication, using annotations and redacted numbers. All interface text in this post appears exactly as Meta displayed it in German on that day; the rules behind it are taken from Meta Help. We did not save or publish anything in the process.
This article follows the step-by-step process of building a campaign, from getting started to measuring results with Meta Pixel, followed by common beginner mistakes and the changes coming in 2025 and 2026. We openly admit that we sell a package that includes Meta Ads management, and we’re just as open about telling you when you don’t need it.
In a nutshell (as of October 2026)
For inquiries, select the "Leads" campaign objective, set only valid limits under "Restrictions" in the ad set, and enter the advertiser for the EU before publishing for the first time. According to Meta Help, your ad cannot be published without this information, and it is usually missing from the German guides we’ve reviewed. Under “Suggest Audience,” Meta’s interface allows you to target people outside your settings, whereas under “Restrictions,” it does not. Go to adsmanager.facebook.com today, check the objective for each campaign, and set the advertiser and payer as defaults in your ad account.
Here's How to Access the Ads Manager, and Why "Promote Post" Isn't Enough
Open Ads Manager directly at adsmanager.facebook.com, not via the button below a post. In our account, on October 2, 2026, the URL will take us to the Campaigns overview, which features the account selector at the top, a “Potential Assessment,” and the “Review and Publish” button. You don’t pay anything for Ads Manager itself; you’re only billed for the ad budget that goes to Meta. If you have multiple ad accounts, first check the account selector at the top to see which account you’re currently working in.
Above the ad account is the Business Portfolio—often still referred to as Business Manager—which bundles a company’s Pages, ad accounts, and logins. According to Meta Help, you can create it at business.facebook.com by clicking “Create a Business Portfolio,” and one person can create a maximum of two portfolios. The advertising account within the portfolio contains campaigns, payment information, pixels, and audiences—in other words, everything you’ve built up over the years. Therefore, set up the portfolio and advertising account under your business’s name, not under a private individual or an agency.
Launch campaigns designed to generate inquiries in Ads Manager, not via “Promote Post.” According to Meta Help, the “Promote” button under a Facebook or Instagram post follows its own process. Meta hasn’t published a complete comparison of which settings are missing there, so we won’t speculate on them either. One thing is certain: Everything this post shows—that is, the objective, conversion location, restrictions, and EU disclosures all in one place—can be found in Ads Manager, which some people refer to simply as Meta Ads Manager.
Campaign, Ad Group, Ad: What to Set at Each Level
Keep this rule in mind: The objective is set at the campaign level, the target audience and budget are set at the ad set level, and the creative and text are set at the ad level. According to Meta Help, you set the campaign objective at the campaign level, and the budget is either an Advantage+ campaign budget at the campaign level or at the individual ad set level—you can’t have both at the same time. You set up the audience, placements, optimization, and schedule at the ad group level, as shown in the interface of our account. The image or video, text, link, and call to action are part of the ad.
In the overview, you can switch between levels using three tabs: “Campaigns,” “Ad Groups,” and “Ads.” Under our campaign “[MF] Ad Management Beta | Leads | DACH,” there are two ad groups, neither of which is currently active. The toolbar includes “+ Create,” “Duplicate,” “Edit,” “A/B Test,” and “More,” with “Columns: Performance” and “Breakdown” on the right.
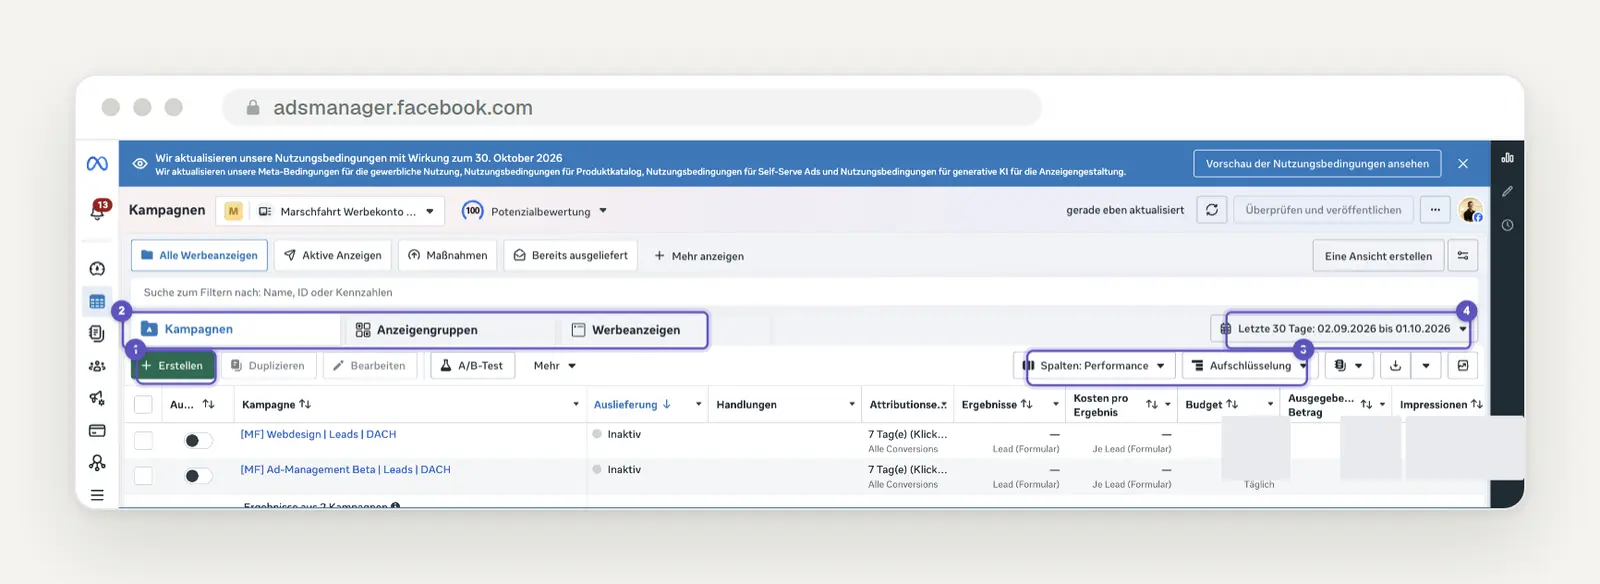
The campaign overview in Ads Manager on October 2, 2026, captured from our own advertising account, with all numbers redacted: “+ Create” starts a new campaign (1), the “Campaigns,” “Ad Groups,” and “Ads” tabs (2), “Columns” and “Breakdown” for analysis (3), and the time period “Last 30 Days” (4).
Name each level so that you can immediately see what’s in it when you look at the table. We use a fixed naming convention consisting of an abbreviation, offer, goal, and region for campaigns, and conversion location, region, age, and audience type for ad groups—for example, “Instant Form | DACH 25-65 | Advantage+ Audience.” One of our ad groups also includes a version number, “V3,” so we can tell the different versions apart. Establish your naming convention before launching your first campaign and document it somewhere where everyone on the team can find it.
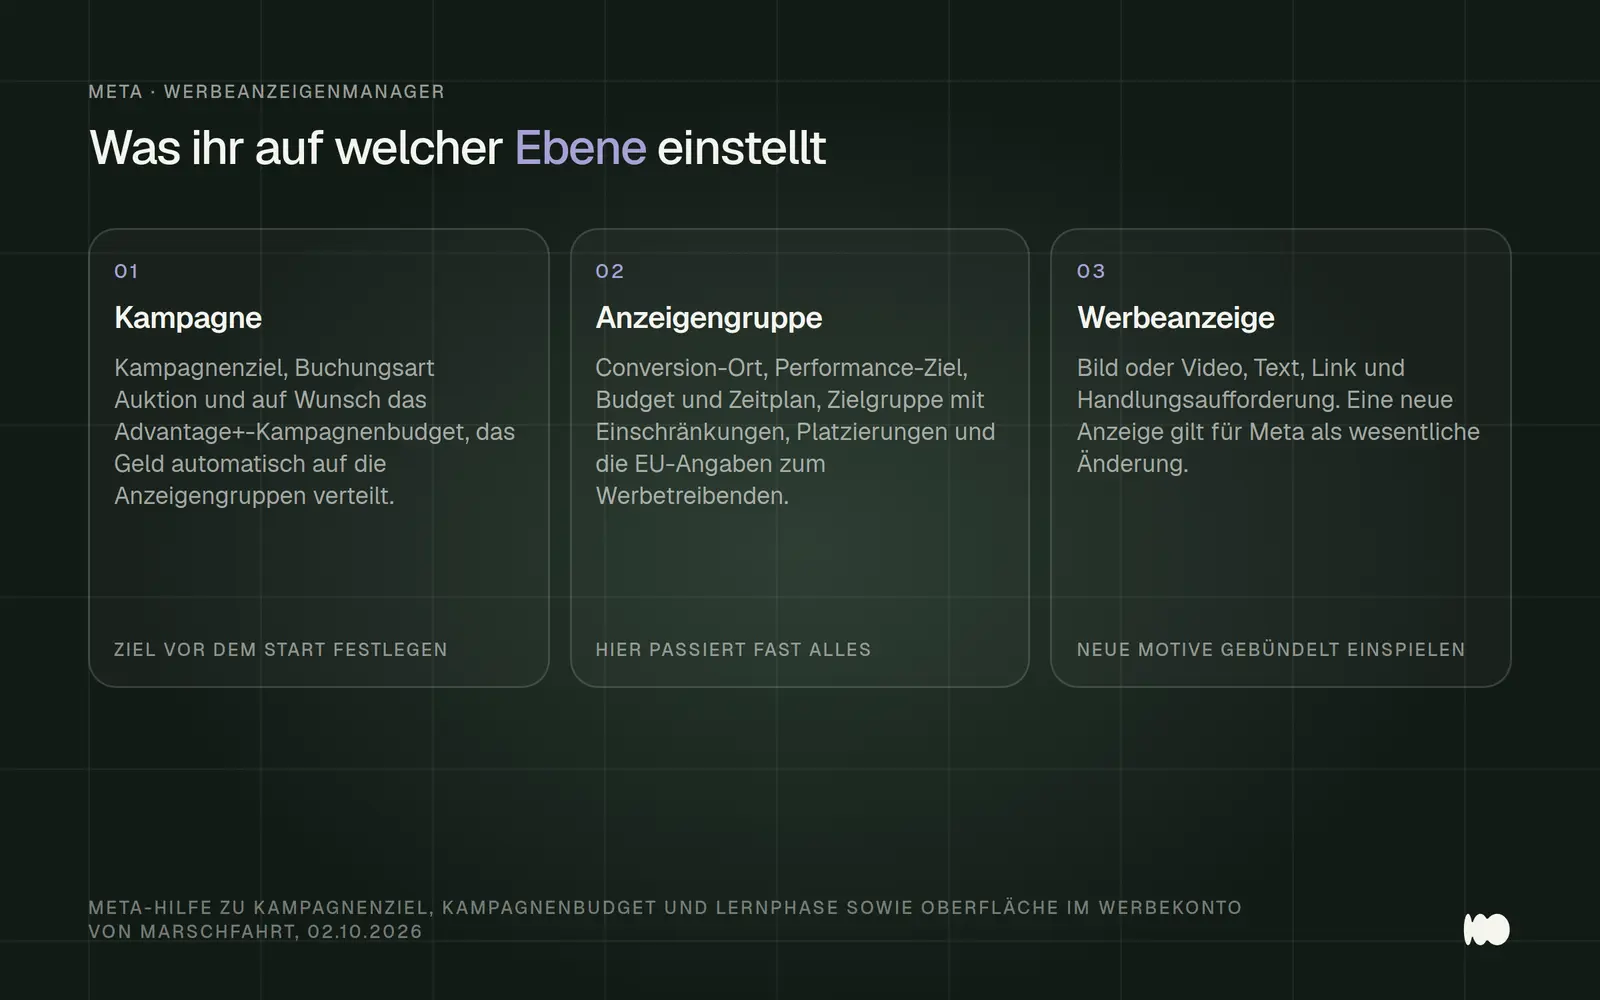
The three levels in Ads Manager: The objective is set at the campaign level, almost all settings are set at the ad group level, and the creative and text are set at the ad level.
Campaign Goal: When it comes to inquiries, you're looking for "leads," not "traffic"
Select the objective based on the outcome you want to pay for; for inquiries, that’s “Leads.” After clicking “+ Create, ” a dialog box opens in your account with “Select booking type,” set to “Auction,” and below that, “Select campaign objective” with six options: Awareness, Traffic, Engagement, Leads, App Promotion, and Sales. As long as nothing is selected, Meta explains there: “Your campaign objective is the business goal you’re aiming to achieve by running your ads.” For “Leads,” it says “Capture leads for your business or brand,” and under “Suitable for:” you’ll find website and instant forms, Messenger, Instagram, and WhatsApp, conversions, and calls.
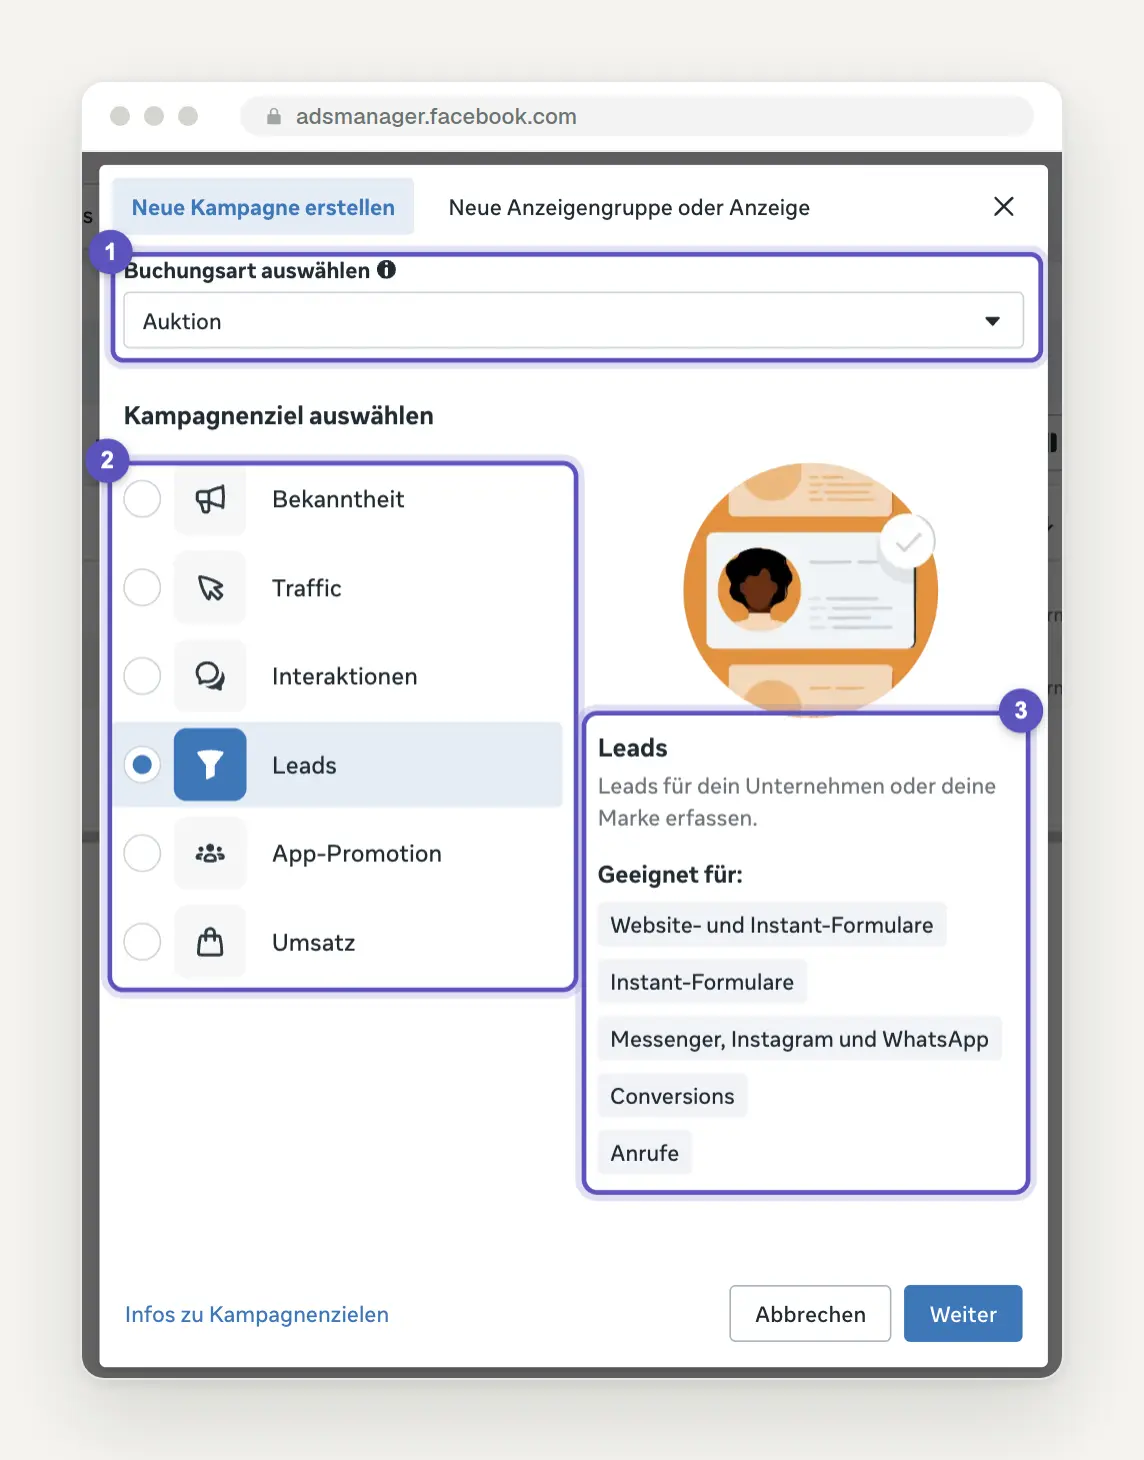
The dialog box that appears after clicking “+ Create” in our account on October 2, 2026: the ad type “Auction” (1), the six campaign objectives (2), and the description of “Leads” with the “Suitable for:” list (3). We deliberately did not click “Next.”
Why not go for traffic, since clicks are much cheaper there? As we showed in our post on the costs of Meta Ads, traffic campaigns in two of the accounts we manage didn’t generate a single inquiry counted by Meta, whereas lead campaigns in two accounts generated inquiries costing an average of €53.38 from the advertising budget (October 1, 2025, to September 30, 2026). Meta aligns ad delivery with the selected objective—so for traffic campaigns, this means clicks rather than completed forms. Therefore, set any campaign intended to generate inquiries to “Leads.”
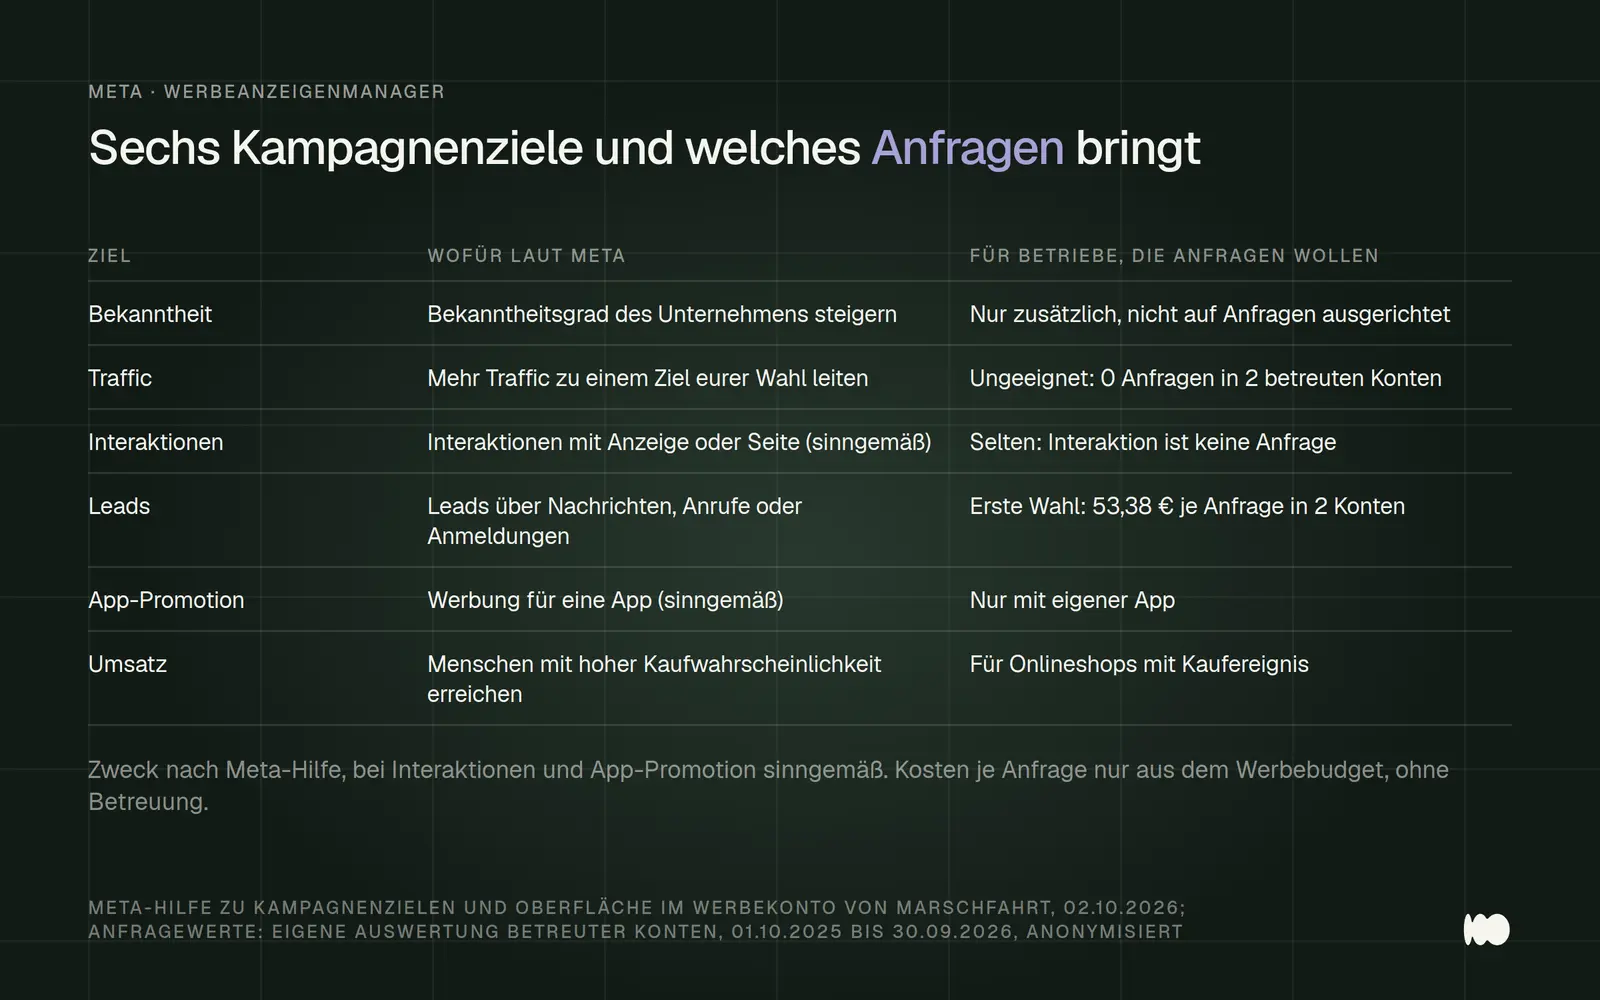
An overview of the six campaign goals: For businesses looking to generate inquiries, “Leads” is the top choice; traffic generates clicks, but in the accounts we manage, it doesn’t generate inquiries.
Decide on the goal before you click “Next,” and don’t treat it as an experiment. According to industry reports, you can’t change a campaign’s goal after it’s launched—you’d have to create a new one. If you just want to see what’s behind the goals, hover your mouse over them as the dialog suggests and click “Cancel.” In our experience, clicking “Next” causes the wizard to create a draft that you’ll otherwise have to clean up later.
Set up an ad group: Start with the conversion location and performance goal
First, set the conversion location, because this determines whether the request takes place on Meta or on your website. In our ad set, under the “Conversion” section, you’ll see the instruction “Select where you want to generate leads,” with “Instant Forms” as the option—that is, a form that opens directly on Facebook or Instagram. Below that, under “Facebook Page,” select the page you’re promoting, and a message will confirm: “You have accepted Meta’s Lead Ads Terms of Service for this page.”
Under “Performance Goal,” Meta states: “You use this goal to measure the success of your ads.” For us, it says “Maximize the number of leads,” with the explanation: “We’ll try to deliver your ads with the goal of reaching as many leads as possible.” Below that are “Cost target per result: None” and “Value rules: Enabled: No”; we’re intentionally leaving both of these as is for now. Don’t set a cost target until you know your actual cost per lead after a few weeks.
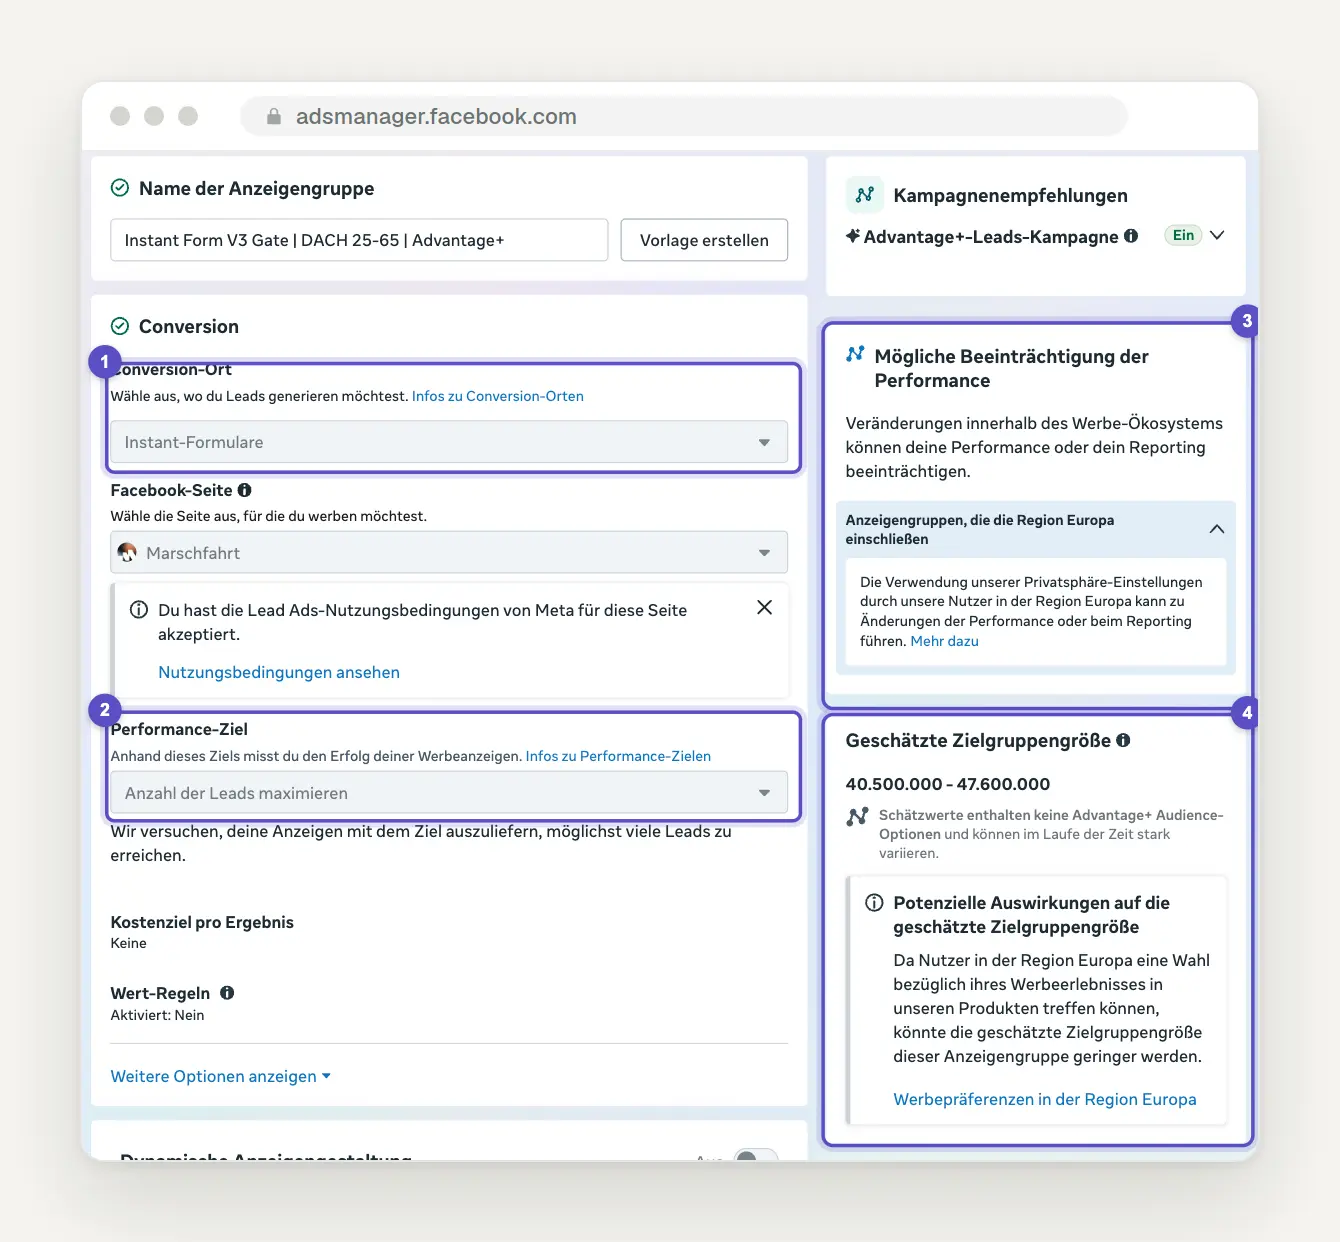
The ad group in Edit view, My Account, October 2, 2026: Conversion location “Instant Forms” (1), performance goal “Maximize leads” (2), the expanded note on the Europe region (3), and the estimated audience size with the “Europe” qualifier (4).
Read the right-hand column before you save, because Meta itself warns there about potential performance losses in Europe. In our account, “Advantage+ Leads Campaign” is set to “On,” and below that is a box labeled “Potential Impact on Performance.” When expanded, it states for “ad groups that include the Europe region”: “Our users’ use of our privacy settings in the Europe region may result in changes to performance or reporting.” For our ad group targeting Germany, Austria, and Switzerland—which, according to its name, is aimed at people aged 25 to 65—Meta estimates the target audience at 40,500,000 to 47,600,000 people and adds that estimates can “vary significantly over time.”
Directly below that it says: “Since users in the Europe region can choose their advertising experience in our products, the estimated audience size for this ad group may be lower.” This refers to the choice between personalized and less personalized ads, which Meta has committed to providing to the EU Commission by January 2026. Meta does not quantify the extent of this effect, and anyone who claims to have a specific percentage is just speculating. Therefore, plan your ads around offers that are clear from the image and the first sentence, rather than relying on finely tailored interests.
Setting a Budget: Campaign Budget, Daily Budget, and the 75 Percent Rule
If you have more than one ad group, set the budget at the campaign level and let Meta handle the allocation. According to Meta Help, the Advantage+ campaign budget allocates funds in real time, “prioritizing the best-performing ad groups,” and is intended for at least two ad groups. In our ad group, under “Budget and Schedule,” the following statement appears: “The campaign budget automatically distributes your daily budget of [redacted] across all ad groups to achieve the best possible performance.” Then, as Meta Help recommends, evaluate the campaign as a whole rather than each ad group individually.
Calculate the daily budget as an average, not as a fixed limit for each day. According to Meta Help, the daily budget is the average amount per day, whereas a campaign budget applies to the entire campaign duration. Meta states: “On days when better advertising opportunities arise, Meta may spend up to 75% more than your daily budget.” And further: “For each week ending at midnight on Saturday, no more than seven times your daily budget will be spent in total.”
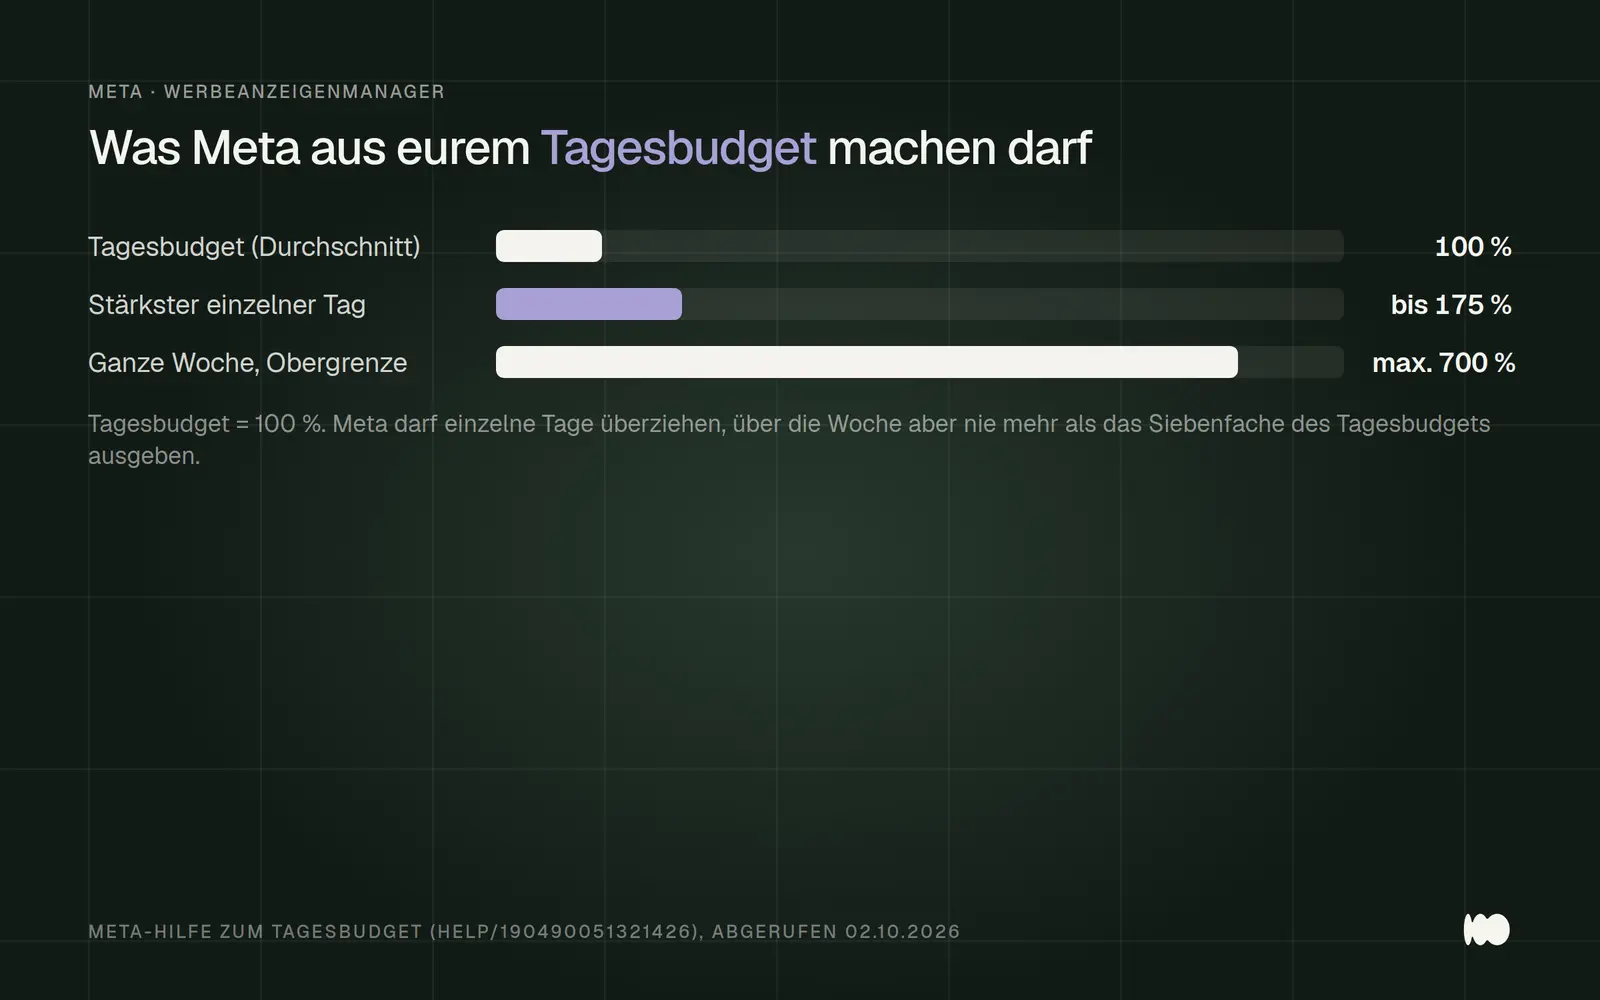
What Meta is allowed to do with a daily budget: up to 75% more on individual days, but never more than seven times the daily budget over the course of a week.
For your planning purposes, this means: A single day can cost almost twice as much, while the weekly cost remains seven times as much. Therefore, set your daily budget so that you can comfortably afford seven times that amount per week. Under “Schedule,” you’ll find the start date and the “Set end date” checkbox; for events with a fixed end date, enter a date there.
We’re deliberately not specifying a minimum amount in euros; Meta only sets low technical minimums, which the Ads Manager displays when you enter your budget. Based on our experience, we recommend an advertising budget of at least €1,500 per month for reliable figures; the reasoning behind this, based on the learning phase, is explained in the post on costs. Divide your monthly budget by 30, enter that as your daily budget, and compare it to your actual spending after the first week.
Target Audience: What is listed under “Restrictions” is strictly enforced; everything else is a suggestion
Under “Restrictions,” enter only what must be excluded—especially your delivery area—and enter everything else as a suggestion. The target audience in our account is marked as “Advantage+ enabled” and includes the phrase “Set up your target audience using restrictions and suggestions.” Under “Restrictions,” Meta states: “We do not target people outside of these settings, even if Advantage+ is enabled.” Under “Suggest Audience,” on the other hand: “We also target people outside of these settings if it’s likely to improve performance.”
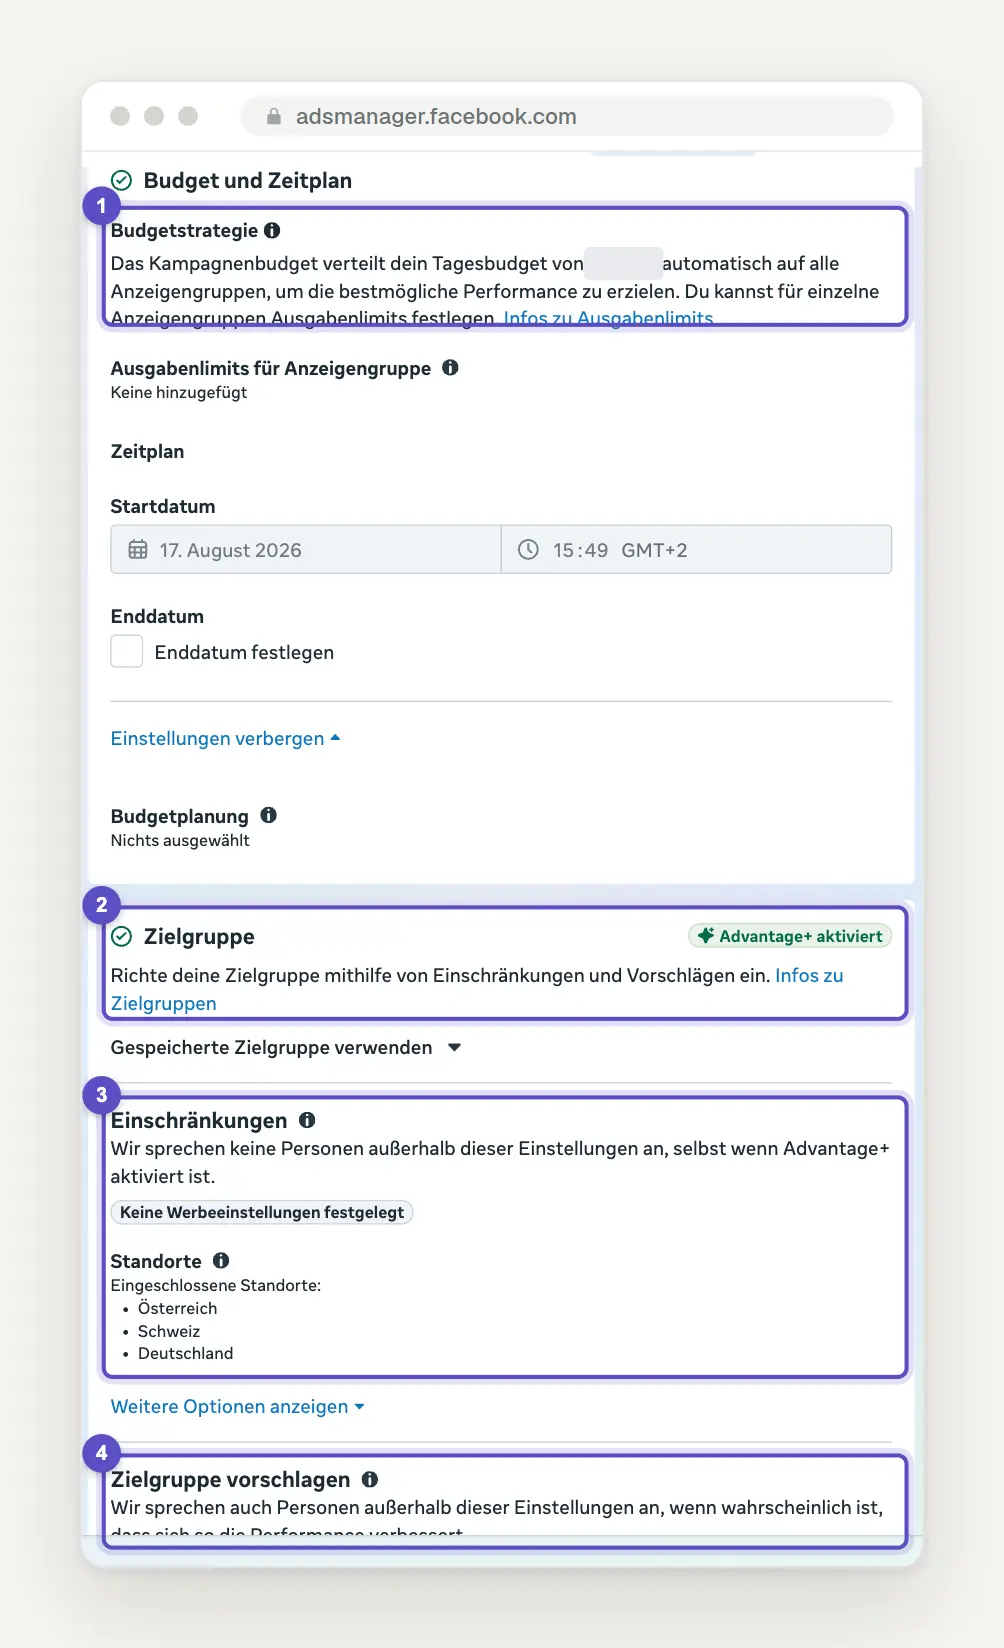
Budget and target audience in our ad group on October 2, 2026; the amount is blacked out: the budget strategy with the campaign budget (1), the target audience with “Advantage+ enabled” (2), the “Restrictions” section with the three countries as locations (3), and the “Suggest audience” section (4).
Here’s the difference that older guides don’t mention: An age or interest that you enter as a suggestion is a hint for Meta, not a restriction. In our settings, under “Restrictions,” it says “No ad settings specified,” and under “Included Locations,” it lists Austria, Switzerland, and Germany; everything else is treated as a suggestion. If you only work in Cologne and the surrounding area, that location should be listed under “Restrictions”; otherwise, you’ll be paying for people you can never serve. Check each ad group to make sure your area is listed there and not just among the suggestions.
Choose locations based on the area where your customers live, and factor in travelers passing through. According to Meta Help, selecting a location allows you to reach people who “live in or have recently been in that location.” According to Meta, a radius around a location is “not available when you use ZIP codes, states, regions, or countries.” So, for each ad group, decide on either a location with a radius or a list of ZIP codes, and don’t test both in the same group.
Provide Meta with your own data as a suggestion instead of letting it guess your interests. In the “Suggest Audience” section of your account, you’ll find “Include these Custom Audiences” and “Create New.” According to Meta Help, you can create Custom Audiences using data you already have: website visits tracked via the pixel, customer lists, app data, offline data, catalog data, or interactions with your content. According to Meta, “up to 500 Custom Audiences” are possible per advertising account.
A Lookalike Audience builds on this: “With a Lookalike Audience, you can reach new people who are similar to your existing customers,” writes Meta. According to Meta, the smaller the selected percentage, the more closely the people resemble the source group. Customer lists contain personal data, so before uploading them, check with your data protection advisor to make sure you’re allowed to use them for this purpose. Then start with a list of your previous clients as a suggestion, save the audience using “Save Audience,” and check back in four weeks to see if the cost per lead has decreased.
Placements: Facebook and Instagram Ads in an Ad Set
Leave Advantage+ placements enabled and run Facebook and Instagram ads in the same ad set. According to Meta Help, Advantage+ placements distribute your ads across Facebook, Instagram, Messenger, Audience Network, and Threads, with the goal of achieving “the most optimization events at the lowest average total cost.” In our account, under the “Placements” section with “Advantage+ enabled,” it says: “We’ll automatically show ads where people are most likely to engage with them.” There isn’t a separate Instagram Ads Manager; Instagram is listed as a placement here, and you create Instagram ads using the same tool.
Don’t disable a placement just because it looks more expensive in the table. Meta explicitly states in the Help section that “higher average cost per optimization event for a placement” does not necessarily mean that the placement is inefficient. What matters is the cost per result for the entire ad group, not that of a single placement. After four weeks, use “Breakdown” to see where your search queries are coming from, and only then decide whether to exclude anything.
Creating an Ad: Format, Text, Link, and Call to Action
Set up the image or video, text, link, and call to action in the ad, and preview it before publishing. This level contains everything that people will actually see; the target audience and budget are already set in the ad set. Based on our analysis, the first sentence of the ad copy determines whether someone will keep reading, so the offer needs to be placed exactly there. We didn’t enable the ad level for this post on October 2, so please check the preview yourself to see how the ad looks on Facebook and Instagram.
Plan to run multiple ads from the start, rather than adding them one by one later. According to Meta Help, a new ad constitutes a significant change and resets the ad set to the learning phase. Additionally, according to Meta, every new ad and every change to the creative goes through ad review. Therefore, start with a few clearly distinct creatives and roll out new ones in batches.
Keep the quick form short and ask only what you really need to know for the callback. This is our practical approach, not a hard-and-fast rule: Every additional field is a hurdle, and you can ask for any missing information during the callback. Determine in advance what constitutes a useful inquiry, such as location, project, and timeframe.
EU Mandatory Disclosures: Nothing Will Be Published Without an Advertiser
Before publishing, fill out the section titled “Information on the Advertiser and Payer Required for Advertising in the EU.” That’s what it’s called in our ad group on October 2, 2026, with the text: “Provide the name of the advertiser and the payer to deliver ads to audiences in the European Union.” “Advertiser” is a required field, and below it is the toggle “Advertiser and payer are not the same person.” According to Meta Help: “Without this information, your ad cannot be published.”
In Meta Help and many guides, this term is referred to as “beneficiary,” but in the German interface it is listed as “advertiser,” so search for both terms. This has been mandatory since summer 2023, based on the EU’s Digital Services Act. According to Meta Help, it applies as soon as an ad is targeted at the EU or associated territories or runs globally. According to the interface, the information is “publicly visible in the Meta Ad Library for one year, but not in the ads themselves.”
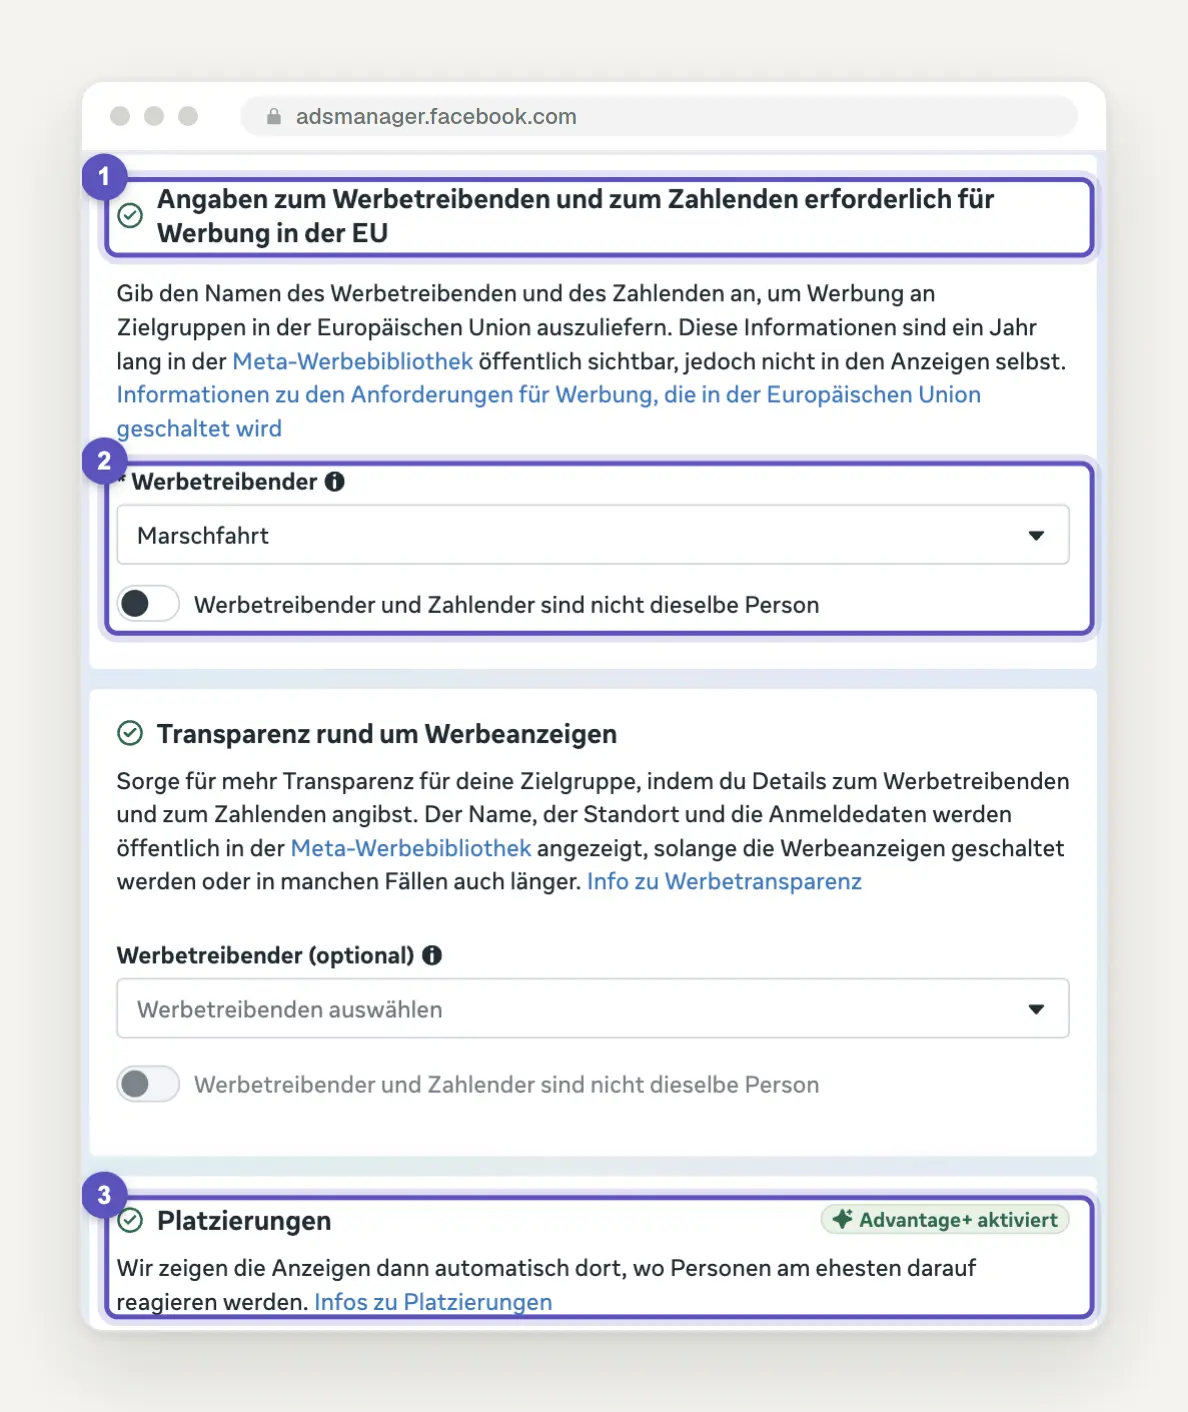
EU information and ad placements in our ad group on October 2, 2026: the required block for advertising in the EU (1), the required “Advertiser” field with the toggle for a different payer (2), and the placements with “Advantage+ enabled” (3).
Toggle the switch as soon as someone other than the advertiser is paying, and set both as the default. This is the case, for example, when a parent company runs ads for a subsidiary. According to Meta Help, you can set the advertiser and payer as defaults in the ad account settings, so you won’t have to fill them out individually for each ad group. Do this today, before the first ad gets stuck at this step.
Below that, in our account, there is a second section titled “Transparency Regarding Ads,” which includes the “Advertiser (optional)” field; the information in this field is also publicly available in the Ads Library. Don’t confuse the two: The top section is required, while the bottom one is optional.
Review and Learning Phase: The First Few Weeks After "Review and Publish"
After publishing, you can generally expect the review to take up to one day; do not make any changes during this time. According to Meta Help: “Ads are typically reviewed within 24 hours.” According to Meta, changes to targeting, creative, optimization, or billing events trigger a new review, whereas changes to budget, bid, or schedule do not. If an ad is rejected, you can request a re-review, according to Meta.
Let a new ad group go through the learning phase without making any adjustments. Meta describes the learning phase as “the period during which the delivery system is still learning how to serve an ad group.” The “Delivery” column, which displays the status “Learning Phase,” indicates whether an ad group is still in the learning phase.
According to Meta Help, the learning phase ends “as soon as performance stabilizes. This usually happens after about 50 results in the week following the last significant change to the ad set.” Meta adds: “The ad group is only returned to the learning phase if a significant change is made.” According to Meta, significant changes include changes to targeting, creative, optimization event, or bidding strategy; a new ad; a pause of seven days or longer; and, depending on the size, a budget change.
To do the math: At €1,500 per month and about €53 per lead, that works out to about 28 leads per month; for 50 leads per week, an ad group would need about €2,650 per week. The learning phase often doesn’t end there—that’s normal and not a mistake. The takeaway for setup is: few ad groups, broad target audiences, and making changes in batches rather than every few days. After launching, set a fixed date four weeks down the line and, until then, only make changes to the campaign if something isn’t working.
Meta-Pixel, Events Manager, and Conversions API: Measuring Requests Accurately
Set up the Meta Pixel with the standard "Lead" event as soon as you start receiving inquiries through your website. The pixel is the Meta script on your website that reports events—such as a submitted inquiry—to Meta. According to Meta’s developer documentation, there are standard events for this purpose, including Lead, Contact, Schedule, CompleteRegistration, SubmitApplication, and Purchase. According to Meta Help, you can set this up in Meta Events Manager by selecting “Link Data” and then “Web.”
For instant forms, Meta counts the submitted form itself; you don't need a pixel for that. However, once a request is made on your landing page, Meta only sees it if a pixel or the Conversions API reports it. This is crucial during the learning phase, because any request that Meta doesn't see is missing from the system's learning process.
Also send requests via the Conversions API, but only with consent. According to Meta’s developer documentation, Meta processes Conversions API server events in the same way as pixel events and merges duplicates if both methods report the same data. The legal platform e-recht24 states that the Conversions API requires the same consent as the pixel, so it is not a way to bypass the consent banner. Do not allow either to send data until consent has been obtained, and mention Meta in your privacy policy—this is a general guideline and not legal advice.
Set up your table so that the cost per inquiry appears at the top. In our overview, the “Columns: Performance” view shows, among other things, delivery, attribution settings, results as “Lead (Form),” cost per result as “Per Lead (Form),” budget, amount spent, and impressions. Use “Breakdown” to further break down the numbers; set the time period at the top—in our case, “Last 30 Days.” Once a month, compare the leads in this table with the inquiries that actually arrive in your inbox.
Seven Beginner Mistakes in Ads Manager That Cost You Money
Check your campaigns against these seven points before allocating more budget. Six of these points are derived from Meta’s help pages, which we cited above; the seventh comes from our practical experience. First: constantly make adjustments, even though every significant change restarts the learning phase. Second: stop running placements based on their individual costs, even though Meta explicitly states that higher costs for a placement do not necessarily indicate inefficiency.
Third: Within a campaign budget, evaluate individual ad groups rather than the entire campaign. Fourth: Manually turning ads on and off and calling that a test—Meta advises against this and offers A/B testing, in which, according to Meta, the target audiences are “evenly divided and statistically comparable.” According to Meta, you can test images, text, target audiences, and placements.
Fifth: Stick to a strict daily budget limit, even though Meta is allowed to spend up to 75% more on certain days. Sixth: Don’t set up the advertiser for the EU and then wonder why nothing is being published. Seventh: Launch campaigns for inquiries via “Promote Post” instead of in Ads Manager, where the target, conversion location, and restrictions are all in one place. If you’re advertising for a solar business, you’ll find the typical mistakes in this industry in our post Meta Ads for Solar Contractors.
Here are two special cases to note: When it comes to housing, jobs, finance, or politics, be sure to check the specific ad categories in advance. According to Meta Help, separate rules apply to housing, job listings, financial products and services, as well as political and social issues; restrictions include, among other things, “target audience selection based on age, gender, or ZIP code,” lookalike audiences, and exclusions. Therefore, if you’re advertising apprenticeships or financing, plan for a broad target audience from the start.
If your account is restricted, check facebook.com/accountquality first. According to Meta Help, ad restrictions range from spending limits to the loss of the ability to run ads at all, and your account quality score indicates which aspects are affected. Read the explanation there before making any changes to your ads, because any change to the creative or targeting will trigger a new review anyway.
What Has Changed and What That Means for You
Summer 2023: Advertisers and payers will be required to provide this information for ads in the EU. This requirement is based on the Digital Services Act. For you, this means: No ad will be published without this information entered in the "Advertising in the EU" section; be sure to set it as the default in your advertising account.
March 31, 2025: According to industry reports, exclusions in detailed targeting will no longer be available in ad groups. We have not verified a Meta source for this. For you, this means: Don’t rely on exclusion tricks from older guides.
October 2025: Meta will no longer run political, election-related, or sociopolitical ads in the EU. This is stated in the announcement updated on October 6, 2025, in the Meta Newsroom; the background is an EU regulation on political advertising that takes effect on October 10, 2025. For you, this means that if, for example, you’re an organization running an ad on social issues, you should check in advance whether the ad falls under this regulation.
October 8, 2025: Meta’s v24.0 API will discontinue the old Advantage+ Shopping and App campaigns. According to the developer changelog, these campaigns can no longer be created, duplicated, or updated; the structure will be standardized. For you, this means: Advantage+ is now part of the standard campaign, which appears in our system as an “Advantage+ Leads Campaign” with “On.”
January 2026: Users in the EU will be able to choose between personalized and less personalized ads. The European Commission announced this on December 8, 2025. For you, this means: Meta warns within the ad group itself that performance, reporting, and estimated audience size in Europe may be affected.
January 12, 2026: According to industry reports, the 7- and 28-day attribution windows after a view will be eliminated. We have not verified a meta-primary source for this; in our account, the “Attribution Setting” column shows a truncated entry on October 2, 2026: “7 day(s) (click…)”. For you, this means: Do not blindly compare results from before and after January 2026; instead, check your account to see which setting is currently in effect.
January 15, 2026: Campaigns with outdated targeting options will no longer run. According to Meta’s changelog for v24.0, this applies to campaigns created before October 8, 2025, unless the options have been replaced with the suggested combined options. For you, this means: Don’t blindly duplicate an old campaign; instead, rebuild the audience from scratch.
October 30, 2026: Meta is updating its Terms of Service for advertising. A banner in our account announces this update, which affects, among other things, the Terms of Service for Self-Serve Ads and for generative AI in ad design. For you, this means: Read the banner in your account before using AI features for ad creatives.
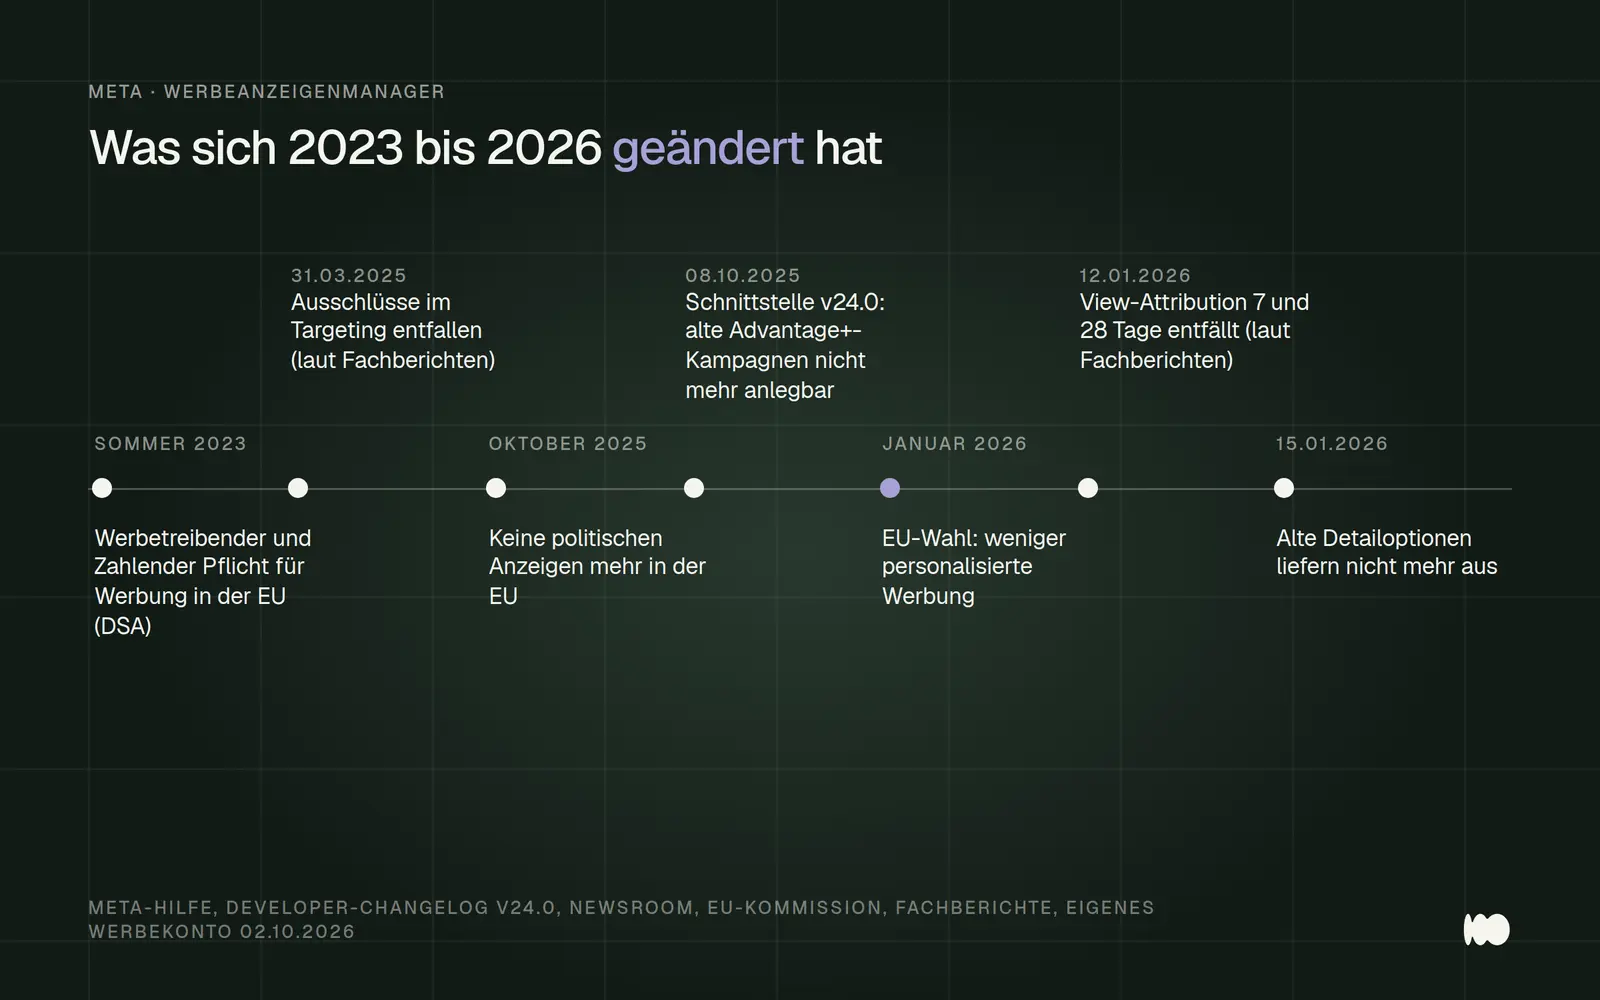
Changes to the Ads Manager between 2023 and 2026; attribution in January 2026 is documented only in technical reports.
Do it yourself or hire someone to take care of it: an honest assessment
Do it yourself if you have the time, can create your own ad creatives, and are working with a tight budget. The Ads Manager is free to use, and this guide will walk you through the process of launching your first campaign. The real work begins after that: uploading more creatives, sticking with it through the learning phase, matching leads with your inbox, and keeping tracking pixels and consent settings up to date. Keep track of how many hours this takes for a month, and multiply them by your hourly rate.
Let Meta Ads manage your campaigns if you’re short on time, creative assets, or tracking capabilities—and if your budget is large enough. With small budgets, a management fee eats up the lion’s share of the costs, as we showed in our post on costs using a full-cost analysis. Pay attention to four things in every proposal: The ad account belongs to you, creative assets are included, the campaign duration is clearly defined, and it’s specified who will build the landing page with tracking. Above all, make sure to get written confirmation of account ownership, because the ad account contains the history, pixels, and target audiences.
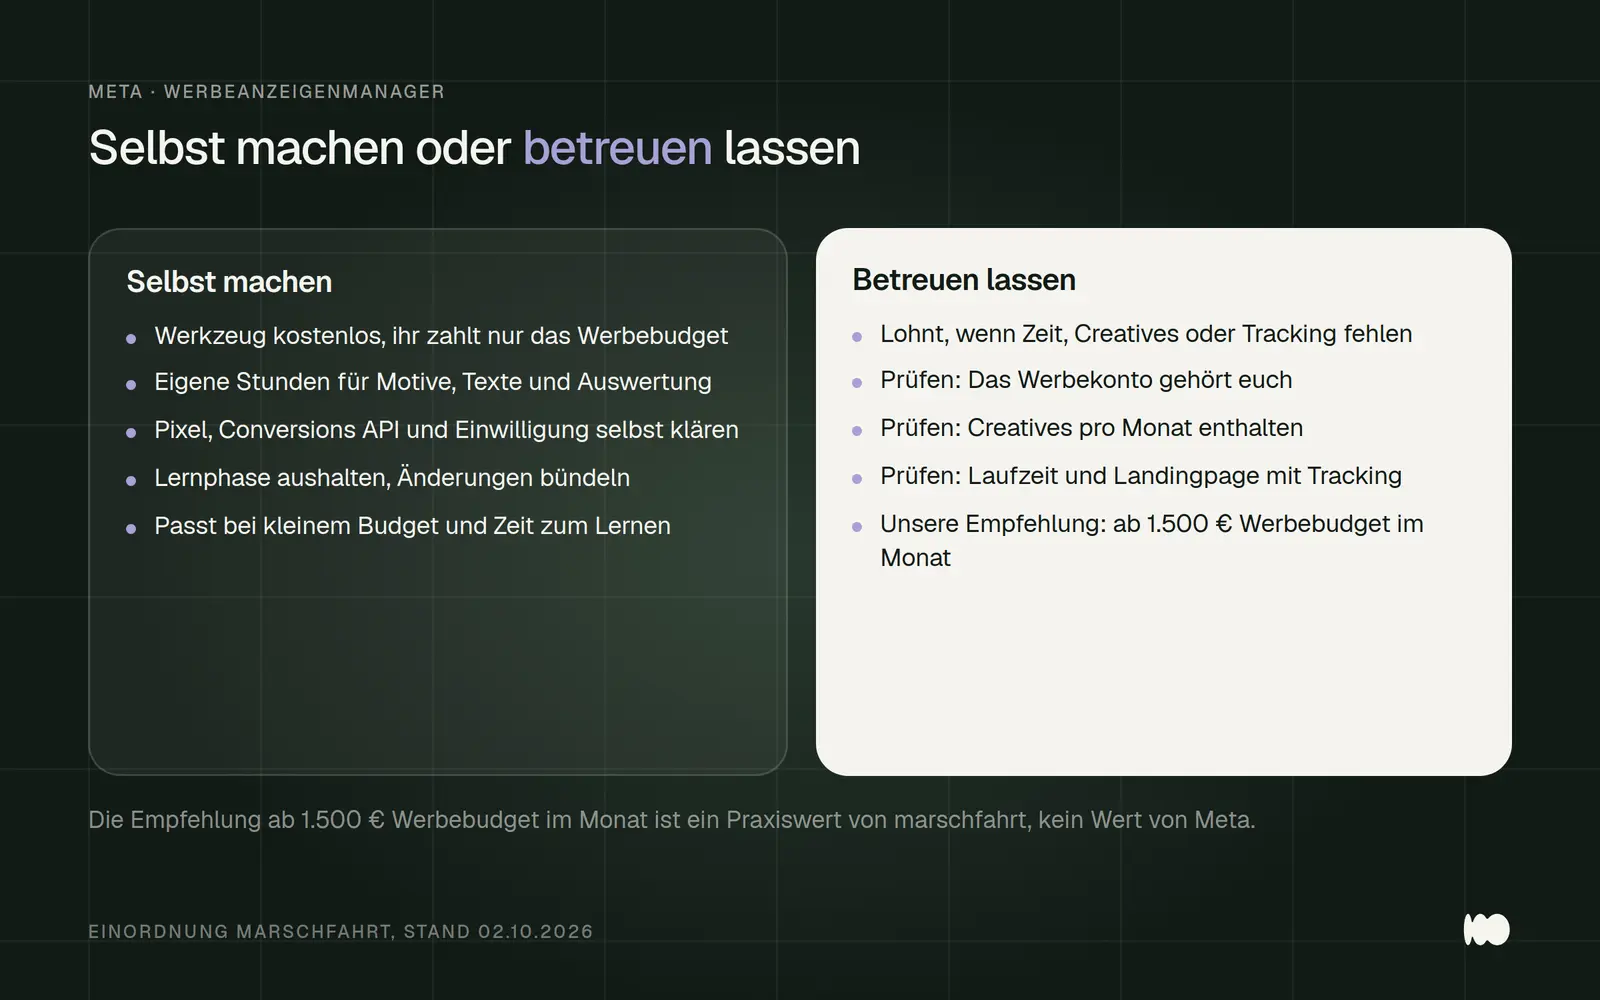
Do it yourself or have it managed for you: The ad manager is free, but your time isn't—and if you opt for managed services, the advertising account, creatives, campaign duration, and landing page all factor into the cost.
Our Ad Management Package: What's Included and Who It's Not For
If you don't want to manage the ad manager yourself, you can leave the entire process to us. With our ad management package, we handle the setup, campaign structure, and ongoing optimization of your Meta Ads and deliver 15 or more new creatives every month. We’ll also build a landing page with tracking that belongs to you—just like the ad account—and you’ll be able to view all the metrics in a live dashboard. Once a month, we’ll discuss results and next steps during a strategy call.
In the beta, the package costs €1,499 net per month, plus an advertising budget that goes directly to Meta, and (as of October 2026) there are five spots available. Your campaigns will go live within 14 days; otherwise, the first month is free, and the minimum term is three months. We recommend an advertising budget of at least €1,500 per month; reliable metrics will be available after four to six weeks. We do not guarantee results because no one other than Meta controls the auction.
For some businesses, this package isn’t worth it, and we make that clear before the first meeting. If you can’t spend more than €1,500 a month on advertising, don’t want to commit to three months, or expect results within the first week, you’re better off following this guide and doing the work yourself. The same applies to small order values, where the cost of a single inquiry is less than what it would cost to manage it. So before you contact us, calculate what an inquiry is worth to your business.
Conclusion: today, this week, later
Today, open adsmanager.facebook.com, check the objective for each campaign, and set "Advertisers" and "Payers" as the default in the ad account. Replace any campaigns that are intended to generate leads but are running on traffic with a new lead campaign. To do this, establish a naming convention for campaigns and ad sets.
This week, you’ll set up a lead campaign with two ad groups and a campaign budget, with only one ad group having a budget assigned to it, your geographic region specified under “Restrictions,” and everything else under “Suggest Audience.” If the request occurs on your website, you’ll set up the Meta Pixel with the “Lead” event and the Conversions API—both of which require consent. Do not upload customer lists for Custom Audiences until data protection issues have been resolved.
Later, after four weeks without any significant changes, compare Meta’s leads with your inbox, review the breakdown, and decide on the budget, cost target, and new ad creatives. If you don’t want to handle this work yourself, you can have Meta manage your ads; the terms are outlined in the previous section.
Should we go over your first campaign with you, or should we just take it over right away?
Send us a link to your website or Facebook page and your planned advertising budget, and we’ll give you an honest assessment of whether you can handle it on your own or if it’s worth hiring us to manage it for you. If it’s a good fit, we’ll show you how we’d set up your campaign in Ads Manager. If it’s not, we’ll tell you just as clearly.
Just send us a quick message using our contact form. We'll respond within 24 hours, personally and without any sales pitch.
More Articles
© Marschfahrt Studio
Practical knowledge on web design, SEO, AI, and conversion optimization. Based on real projects, without any marketing spin.

